Getting started with Kelloo
CHAPTER 4
Scenarios and what if analysis
Sometimes you need to look at things differently. And this is the same in resource management. Perhaps you need to see the impact of taking on more projects, delaying work, stopping work on a project, hiring more resources or adjusting the timing of projects.
This is where scenarios and what if analysis can help. They let you understand…”hey – what happens if we do this?”.
In this guide we use the terminology projects to keep things simple. But you can use Kelloo to plan and schedule projects, products, agile sprints, service engagements or anything else. You can also customize the terminology and structure in Kelloo to match the language and workflow your team uses.
Section Overview
In this section you will learn about:
- How to use scenarios
- Extend or shorten the length of projects
- Adjusting the timing of projects
- Excluding projects to model holding or stopping work on a project
- Adjusting resource capacity
How to use scenarios
Think of scenarios as versions of a plan. Each plan can have multiple scenarios. It has one master scenario (the current schedule you are working to). You can also create an unlimited number of “sandpit” scenarios where you can test out changes. If a scenario looks like a better option you make it the master scenario.
In the planner, reports and views you can select which scenario you want to work with. So you can swap and change between different scenarios to compare them.
Here is how to create a scenario:
- Select the scenario selector.
- Choose manage scenarios.
- Select add scenario or copy an existing scenario.

Use the scenario selector to choose which scenario you want to work with. Once you have selected the scenario you want to work with, just use the planner as you normally would.

How you might use scenarios
You have a well optimized plan that you are working to – this is the master scenario. You have a pipeline of projects seeking approval and you need to understand when you can fit them in and how many people you need.
- Create a copy of the master scenario.
- Working with the copy, add in the new projects, adjust resource capacity and adjust timings etc.
- Use this to help inform what you can do or what people you need to hire.
- Your original master scenario is untouched.
- At any point you can make the copy the master.
What if analysis and planning
What if planning can be used to see what happens if you change project timings, projects take longer than expected, you hire or fire resources or you cancel or include projects.
Extend or shorten the length of projects
You can change a project’s length using the resize project feature. This lets you extend or shorten the project’s total length or duration. When you resize a project you can keep the total amount of work the same or adjust it to take account of the new duration.
Pro tip
As you adjust things like the length of a project, the timing of a project or change its inclusion status, you can check the impact on your resource pool utilization. So make sure you have the resource status panel open in the planner. Open the resource status panel by selecting view resource utilization at the bottom left of the planner.
Here is how to adjust the length of a project:
- Select the project bar and choose the move or resize project option.

- Select the resize tab.

- Choose the number of weeks to extend or shorten by. You can also set an explicit date.
Then choose if you want to keep the total amount of work the same or if this should be adjusted based on the new project duration.
- Select keep the same if you want the total work to remain the same.
- Select adjust based on new project duration if you want the total work to be adjusted based on the new project duration.
Pro tip
You can control what happens to the total amount of work in a project when you resize it.
Here is a simple example. You have a 10 week project with a total amount of work of 100 days (10 days per week). You extend the project to 20 weeks.
- If you don’t adjust the work the project will still have 100 days work, but the work will be spread across 20 weeks meaning 5 days per week is scheduled.
- If you adjust the work, the total work will adjust to 200 days and 10 days per week will still be scheduled.
Delay or advance the timing of projects
Sometimes you need to understand if delaying or changing the timing of a project will help resolve resource constraints. Rather than re-schedule each piece of work in the project you can use a what if function to move all the work in the project to a new time period.
Here is how to adjust project timings:
- Select the project bar and choose the move or resize project option.
- Select the move tab.

Excluding and including projects
Do you need to see the effect on your resources of stopping work on a project or approving a new project? You can do this by excluding or including the project in the planner.
When you exclude a project, the project is still visible in the planner, but the project allocations are ignored from utilization calculations, reports and dashboards.
Here is how to change the exclude or include status of a project:
- Select the project bar and choose the include or exclude project option.

- Remember to check the utilization panel to see the impact of what if changes on your resource pool.


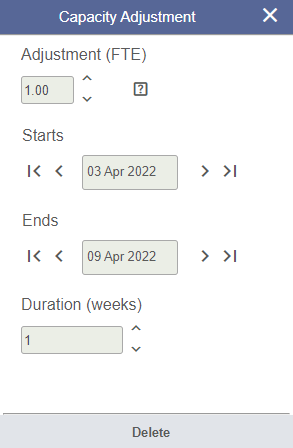
Adjust resource capacity
Sometimes you need to understand if making changes to your headcount can help get things done. For example seeing the impact of hiring 5 more project managers for 6 months.
You don’t want to do this by adding the project managers into your resource pool (as this will increase your availability of project managers). Remember, you don’t know yet if you will hire them. You are just modelling how things would look if you hired them.
You do this using capacity adjustments. Capacity adjustments can be added into any scenario.
Pro tip
As you enter capacity adjustments, the resource plan will adjust to reflect the additional (or reduced) resource capacity.
Here is how to make capacity adjustments:
- Open the resource status panel by selecting view resource utilization bottom left of the planner.
- Select show capacity adjustments (they may already be showing!).

Adjustments can be added to any role or resource.
- Locate the role or resource you want to work with.
- Then in the adjustment row, select the period on the right to add the adjustment to.

Enter the adjustment FTE, the duration and the start date of the adjustment:
- Adjustments can increase or decrease headcount.
- Adjustments can run for multiple periods.